About
Wisedry® Epoxy Resin for Dried Flowers is specially formulated for creating stunning floral resin art. It ensures ultra-clear clarity, superior UV resistance for minimal yellowing and flower-friendly low exothermicity. Perfect for dried flowers, leaves, or other botanical elements.
Important Safety Instructions
- Keep away from children, expecting mothers, and pets.
- Recommended protective gear:
- Gloves: To prevent skin irritation.
- Mask: To prevent inhalation of potential fumes.
- Safety goggles: To protect eyes from potential splashes.
- Alcohol wipes: For easier removal of spilled epoxy.
- Ensure good ventilation by opening windows or using a fan.
- Clean up epoxy spills immediately before they cure.
- If the resin comes into contact with eyes, rinse immediately with plenty of water under low pressure for 15 minutes and seek medical attention.
- If swallowed, rinse mouth and call Poison Center or a doctor.
- Store the product in a shaded, cool place.
How to Use
Note: Please read all steps before you start.
Step 1: Prepare your dried flowers and find a level workspace.

- Drying flowers with Wisedry Flower Drying Crystals is recommended for best results.
- Place a table mat (silicone recommended) to catch spills and keep the table clean.
- You can plan your design by arranging the flowers in the mold and taking a photo for later reference.
Step 2: Prepare your tools.
- Clean your silicone resin mold to remove dust.
- You can use disposable plastic cups as mixing containers.
- Silicone stir sticks are preferred.

- Calculate the volume of your mold to avoid wasting epoxy
Tip: Calculate with our easy tool at wisedry.com/epoxy-calculator
NOTE
- The ideal ambient temperature for epoxy is between 20℃ (68℉) and 25℃ (77℉).
- Hotter temperatures can accelerate curing, leading to cracking, shrinking, or unusual amounts of bubbles. To mitigate this, you can use fans to lower the ambient temperature.
- Colder temperatures can slow curing and increase viscosity. To address this, you can heat the cup of resin (A) and hardener (B) in a warm water bath or on a heating pad until they become thinner.
(Note: After heating, must let them cool before mixing to avoid rapid curing and epoxy cracking.) - High humidity can lead to issues like cloudiness and uneven curing. It is recommended to maintain an air humidity level below 75%.
Recommended bubble prevention/removal methods:
- Pre-Coat Dried Flowers (Before Use): You can pre-coat the flowers with a layer of epoxy to seal the surface pores and allow it to cure before embedding.
- Microwaving Silicone Mold (Before Use): Before use, microwaving the mold for a few minutes can help reduce bubbles later on. Let it cool before use.
- Warm Water Bath (Before Mixing): You can set the cup of resin (A) in a warm water bath until it becomes more fluid, then mix with the hardener (B).
(Note: Avoid heating the mixed epoxy as this may accelerate curing and cause epoxy cracking.) - Vacuum Chamber (After Mixing/When Curing): Do not vacuum for too long, only until bubbles stop forming frequently.
- Heat Gun (After Mixing): You can use a heat gun to remove surface bubbles.
(Note: Do not heat continuously. Allow a few seconds between heating to avoid surface curing and epoxy cracking.) - Toothpick (After Mixing): To pop the bubbles
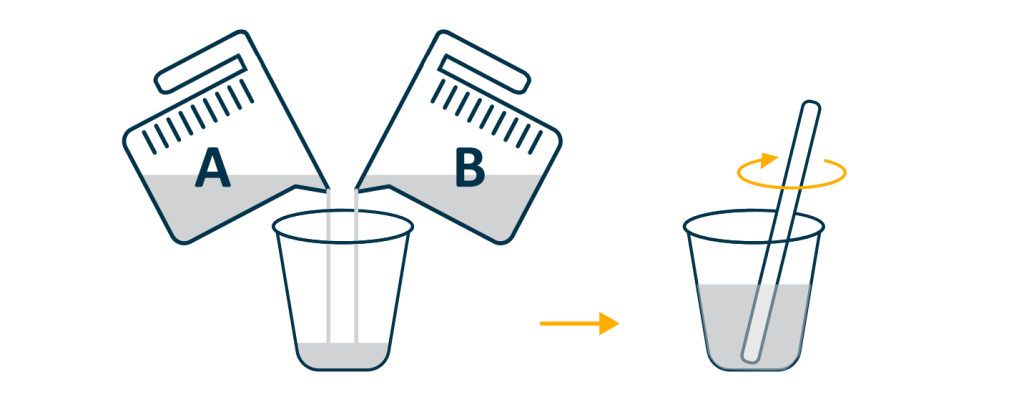
Step 3: Mix the resin (A) and hardener (B) strictly following the required ratio.
- Use a measuring cup for accurate measuring.
- Stir the epoxy until it becomes clear and transparent, free of streaks or swirls. Avoid rapid motions to prevent bringing air into the epoxy.
(Note: Scrape the sides and bottom for thorough mixing.)
Step 4: Slowly pour in the first layer of epoxy, place the dried flowers, and wait for it to harden before pouring the next layer.
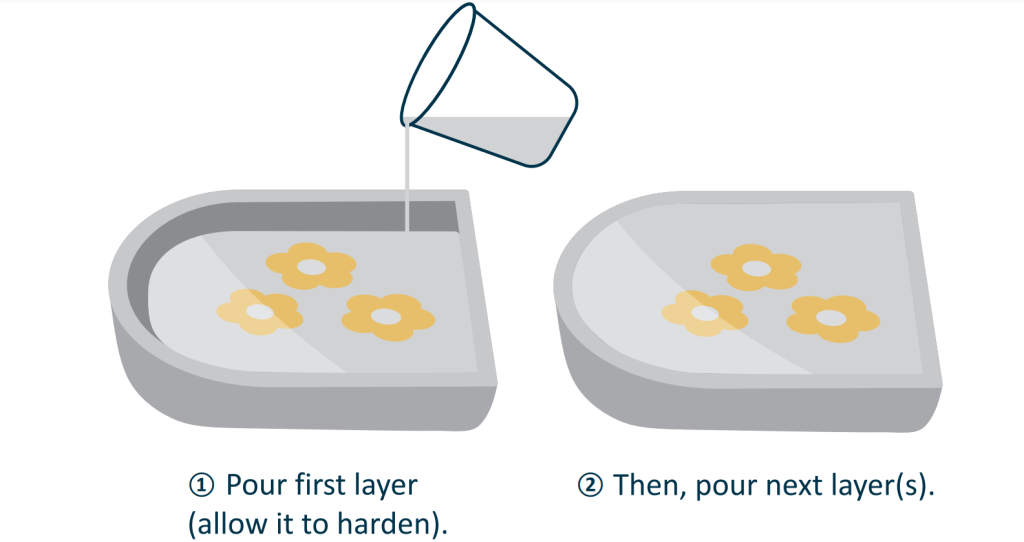
- Pour and cure layers no thicker than the recommended pour depth (specified on the container) at a time to prevent excessive heat generation and epoxy cracking.
- To compensate for epoxy’s slight shrinkage during curing, pour the epoxy slightly above the mold’s edge to achieve a smoother finish.
Step 5: Remove your project from the mold after it is completely cured.
- The curing time varies for different epoxy formulations. Please refer to the epoxy you purchased.

And there you have it – you’ve completed the essential steps for working with epoxy resin! We hope this guide has demystified the process and given you the confidence to dive into your own projects. Remember to always work safely and patiently, and soon you’ll be creating beautiful, durable pieces. Happy crafting!