When two options provide the same total amount of desiccant, compare how their packets fit the real container. Check length, width, resting thickness, seal-edge clearance, available airflow, visibility, and how easily each packet can be removed for inspection or recharging.
The amount and the packet layout answer different questions. Total grams help establish a starting amount for the enclosed space. Packet dimensions determine whether that amount can be placed without blocking the lid, crossing a gasket, being crushed by stored items, or disappearing where it cannot be checked.
For example, one larger packet and several smaller packets may add up to the same labeled amount. That does not make their physical layouts interchangeable. The better fit is the arrangement that sits safely in the available space and shares air with the stored items while following the product instructions.
Confirm The Total Amount Before Comparing Shapes
Start by making the two options equal in the way that matters for this comparison: the total labeled desiccant amount.
Add the packet amounts in each option. Four 5-gram packets provide a total labeled amount of 20 grams; one 20-gram packet also provides 20 grams. This is only a layout example. Packet materials, construction, dimensions, indicator design, and product instructions can differ, so do not assume that products from different lines are otherwise identical.
If you have not yet chosen a starting amount, use the Wisedry Silica Gel Amount Guide first. Do not choose a total amount only because a particular packet shape looks convenient.
Once the amount is established, keep it constant while comparing layouts. Otherwise, you may mistake a difference in quantity for a difference in physical fit.
Use The Actual Packet, Not A Generic Size Name
Terms such as small, medium, and large are not reliable dimensions. Even packets with the same labeled gram amount can have different proportions or seams.
For every option, record:
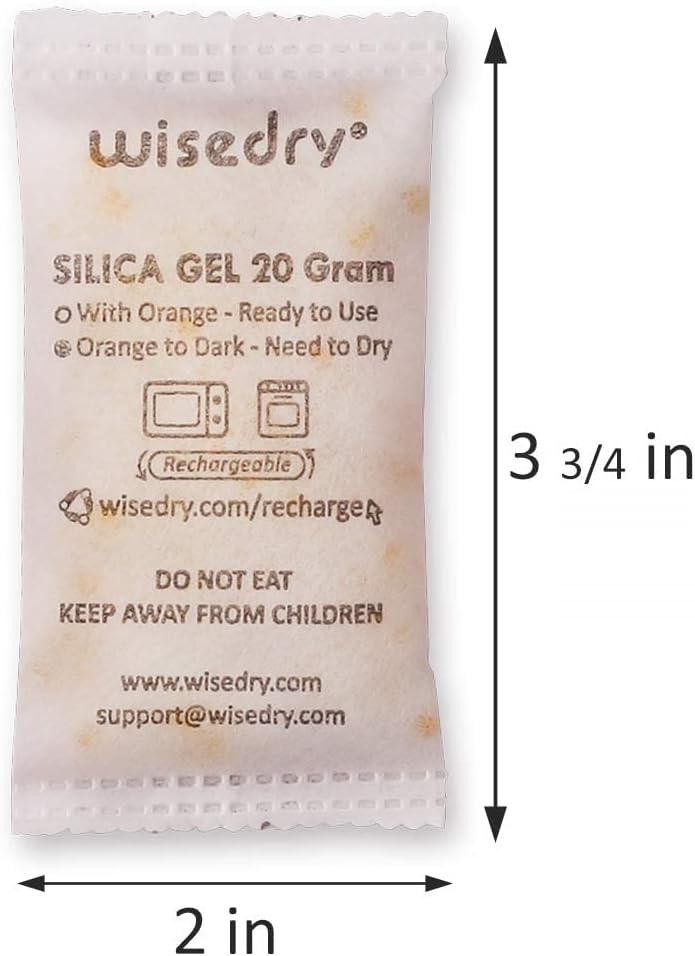
- overall length, including sealed edges;
- overall width, including side seams;
- resting thickness when the packet lies naturally;
- the thickest point after the beads settle;
- flexible edge space that contains no beads;
- any printed indicator area you want to keep visible;
- the number of packets needed to reach the selected total amount.
Use the dimensions supplied for the exact product when they are available. If you already have the packet, measure it while it rests naturally on a flat surface. Do not press it flat, stretch the material, fold it sharply, or count on a latch to compress it into place.
A packet is three-dimensional. Length and width alone can make a layout look suitable even when the filled center is too thick for the lid clearance.
Measure The Packet Zone Inside The Container
Compare each packet with the usable packet zone, not with the broad outside dimensions of the box.
The packet zone is the location where the packet can remain without interfering with the container or its contents. Measure its usable length, width, and depth. Also note any lid ribs, foam, trays, hinges, latches, dividers, and moving objects that enter the space when the container closes.
If you have not recorded those details, follow What To Measure Before Choosing Desiccant For A Storage Container. The article separates internal volume from the smaller clearance zone that actually determines packet fit.
Test the packet zone with the normal contents in place. An empty box can offer a wide flat area that disappears after a tray, spool, case, stack of cards, or folded item is returned.
Compare Footprint And Thickness Separately
A useful comparison has two parts.
Footprint
The footprint is the length and width occupied by a packet while it rests in the planned position. Several small packets may use separate narrow gaps, while one larger packet may require one uninterrupted surface.
Ask:
- Does the full packet, including its seams, remain inside the open area?
- Will the packet overlap the gasket or sealing lip?
- Can the packet slide into a hinge or latch path?
- Does it cover an item that must be removed frequently?
- If several packets are used, is there a clear location for every one?
Do not count the same location twice. A plan for four small packets needs four real positions, not one convenient position shown four times on paper.
Thickness
Resting thickness matters in shallow cases and under fitted lids. Check the thickest filled area rather than only the flexible edge.
Ask:
- Is there clearance when the contents shift upward?
- Does foam press the packet against a hard object?
- Does the lid close normally without using extra force?
- Could the packet become pinched after the beads move to one end?
If a layout depends on squeezing the packet thinner, it does not have dependable clearance. Review How To Keep Desiccant Packs From Being Crushed In Gear Cases before choosing another position.
Compare One Placement Point With Several Placement Points
One larger packet usually creates one main inspection and removal point. Several smaller packets create several placement points. Neither layout is automatically better.
A single placement point can be simpler to count and retrieve, but it needs one area large enough for the complete packet. Multiple placement points can fit around dividers or irregular contents, but every packet must remain accessible and exposed to the same enclosed air.
Do not scatter packets into spaces that are isolated from one another. A small packet hidden under a tightly fitted tray may be difficult to inspect and may not share air freely with the upper compartment. Likewise, a packet tucked into a covered cell should not be assumed to serve every compartment in an organizer.
The guide Should You Use One Large Desiccant Pack Or Several Small Packs? covers the broader layout decision. Use the dimensional check here to confirm whether the preferred arrangement physically works in your container.
Check Air Exposure Without Inventing A Performance Rule
A packet should share air with the stored items and should not be buried beneath a tightly packed object. That does not mean you need to calculate an exact airflow rate or claim that more packets always work faster.
Use a practical inspection instead:
- keep packet surfaces from being completely covered;
- avoid sealed sub-compartments that do not share air;
- leave room around the packet rather than wedging it tightly;
- keep ventilation paths in trays or dividers open;
- place every packet where it remains inside the intended enclosed space.
The goal is a usable arrangement, not an unsupported performance comparison. Follow the exact product instructions for placement, checking, and recharging.
Keep The Indicator And Label Readable
If the packet has a visible indicator or printed instructions, include orientation in the dimensional comparison.
A packet may fit only when turned face-down, placed behind a divider, or covered by another item. That position can make routine checks harder even if it technically clears the lid.
Compare:
- whether the indicator can be seen without removing heavy contents;
- whether the product label remains identifiable;
- whether you can tell which packets belong to the container;
- whether each packet can be counted after the box is filled;
- whether a packet can be removed without pulling on its seams.
Visibility is especially useful when several small packets make up one total amount. If one packet is forgotten during checking or recharging, the real setup no longer matches the recorded layout.
Test The Container In Its Normal Position
A packet that stays flat on a shelf may move when a case is carried upright. Test the arrangement in the way the container is actually stored and handled.
Before accepting the fit:
- Place the normal contents and all packets in their intended positions.
- Close the lid gently and confirm the gasket, hinge, and latch work normally.
- Lift or rotate the container only as it would be handled in routine use.
- Reopen it and check whether any packet moved into a closing path or under a hard item.
- Confirm that every packet is present, visible, and undamaged.
If the packet moves, choose a safer location or use a suitable holder that does not obstruct the packet, the container seal, or the stored items. Do not puncture, staple, or sharply fold a sachet to hold it in place.
Use A Simple Fit Record
Write down both options before deciding:
- selected total desiccant amount;
- packet amount and packet count;
- actual packet length × width × resting thickness;
- available packet-zone length × width × depth;
- number of usable placement points;
- lid, gasket, hinge, and latch clearance;
- indicator and label visibility;
- ease of removal for checking or recharging;
- movement after the container is handled normally.
This record prevents a common mistake: remembering only the total grams and forgetting why a particular packet layout was selected.
Common Comparison Mistakes
- Comparing packet count instead of total amount. Two packets are not equivalent to four packets unless their labeled amounts add up to the same total.
- Using only length and width. Filled thickness often determines whether a shallow lid closes.
- Ignoring sealed edges. Seams occupy space even when they contain no beads.
- Measuring an empty container. Normal contents can remove the planned packet zone.
- Assuming smaller always fits better. Several small packets still need several safe locations.
- Assuming one larger packet is simpler in every box. It may block the only wide surface or cross the gasket.
- Compressing the packet during the test. A forced fit can create pinch points.
- Forgetting retrieval. A packet that fits but cannot be checked or removed is a poor routine setup.
- Treating equal grams as proof of identical performance. Equal labeled amount makes the layout comparison fair; it does not erase product-design differences.
Frequently Asked Questions
Is one 20-gram packet the same size as four 5-gram packets?
Not physically. They may provide the same total labeled amount, but the length, width, thickness, seams, and number of placement points differ. Measure the exact products and compare them with the available packet zones.
Should I choose the thinnest packet?
Choose a packet layout with adequate clearance, shared air exposure, visibility, and safe access. Thinness is helpful only if the complete setup also fits the selected total amount and follows the product instructions.
Can I fold a packet to make it fit?
Do not rely on a sharp fold or compressed fit. Choose a different packet format or location that lets the sachet rest without being crushed, punctured, or trapped by the lid.
Can several packets touch each other?
Use the product instructions and avoid tightly stacking or covering packets. The practical goal is to keep them uncrushed, exposed to the enclosed air, and easy to inspect.
What if neither option fits safely?
Recheck the packet zone and total amount, then consider another approved packet format or another safe placement area. Do not reduce the amount or force the lid closed merely to use a preferred shape. If the layout remains uncertain, contact Wisedry Support with the internal dimensions and clearance measurements.
Choose By Fit After Choosing By Amount
When the total amount is the same, the useful difference is the layout. Compare actual packet dimensions, resting thickness, packet count, available placement points, closure clearance, visibility, and access.
Next step: Confirm the amount with the Wisedry Silica Gel Amount Guide, measure the packet zone, and compare the exact packet formats available in the Wisedry Shop. For an unusual container or divided layout, contact Wisedry Support with the inside dimensions, packet-zone measurements, and opening routine.